
Introduction
Welcome to the first part of “From the Cradle to the OS”! This series will explore how a processor boots an operating system (OS) that can run many programs for multiple users. We will also explore how to write a simple OS that will run a few programs and let them interact.
The idea behind this series stems from the paper “Mind the Gap: Reconnecting Architecture and OS Research” by Jeffry Mogul et al., which was presented at the Usenix Workshop on Hot Topics in Operating Systems (HotOS). In the paper, the authors highlight a significant disconnect between researchers working in the computer architecture space and those working in operating systems, emphasizing the need for closer collaboration and integration between the two fields.
While we will not be addressing those arguments, having experience in academia and teaching both architecture and operating systems classes, I can’t help but note that this gap also extends to higher education (or maybe even originates from there). Most students leave their colleges having made little to no connection between the design decisions made by computer architects and those made when designing an operating system or how one can influence the other. In fact, after surveying 20 operating systems classes at several universities, only about 30% of them have a computer architecture class as an explicit requirement (and some of those that do fall at the graduate level)!
This series is thus a first attempt to bridge that gap in knowledge by starting at the cradle with nothing more than an (emulated) processor. We will gradually build the knowledge necessary to understand how to boot and use an operating system running on that processor. We will then write a small dumb kernel that can run a few simple programs (we’ll call those later processes) on one or more processors. Even better, we will do all that using an open source instruction set architecture, an open source operating system kernel, and a set of open source tools!
What is an ISA?
Software developers often interact with a high-level, abstract, representation of hardware that does not capture the particularity of the hardware’s implementation (e.g., how wires are connected, how memory is addressed, etc.) An ISA specifies the interface through which a programmer can interact with a piece of hardware, identifying exactly what the hardware can do and how it ought to do it. Note that the term programmer here includes the application programmer as well as compiler and assembler writers. The ISA does not specify the implementation of the hardware; that responsibility rests with the chip designer, and ultimately the hardware vendor. As long as a processor implements an ISA, any piece of code written for that ISA will run on it, though with variations in efficiency and performance.
Let’s consider a simple example. We want to build a processor that can perform the function of adding integers, essentially a glorified calculator. Let’s call it PowerCalc2024. To introduce PowerCalc2024 to its users, we need to specify an interface through which those users can interact with the calculator. Factors include the number of supported registers, the size of each register, the memory model, how the system obtains inputs and exposes outputs, and the instructions the calculator can perform, which are mostly addition. Here’s an example of such a specification.
PowerCalc2024 is a state of the art calculator that can add 32 bit integers.
PowerCalc2024 is equipped with 8 32-bit registers (r1 through r8) and has no
memory beyond those registers. Inputs are accepted through one dedicated
register, in0, while the  output is written to a special output register named
o0.
PowerCalc2024 has three instructions:
1. readin rd: Read input from in0 into register rd.
2. writeout rs: Write the register rs into the output register o0.
3. add rd, rs1, rs2: Add the two registers rs1 and rs2 and store the result
into register rd.In this short example, you can see that our ISA specifies what a programmer needs to know to be able to interact with our PowerCalc2024 calculator. It does not specify how the addition operations are implemented; whether a particular branch of the PowerCalc2024 calculator uses ripple-carry adders or carry-lookahead adders is not exposed through the ISA. But, as long as either type of calculator implementation satisfies the ISA requirements, the same code targeted for PowerCalc2024 should run correctly (note, the ripple-carry adders would run slower than their counterparts).
You have probably heard about many different ISAs, the most popular of which are Intel 64, IA-32, and ARM. However, many more exist, such as MIPS, Thumb, and MOS 6502. which powered the Nintendo NES console. In this series, we will turn our focus to an exciting project that started back in May 2010 to provide an open source ISA that is freely available for personal use, academia, and the industry, namely RISC-V (pronounced risk-five).
What is RISC-V?
RISC-V is a Reduced Instruction Set Computer (RISC – thus the name) architecture that defines a small set of base instructions that processors must support, with many extensions that target different system requirements. Compared to Complex Instruction Set Computer (CISC) architectures (such as Intel’s x86), RISC-V base instructions are small, simple, and highly optimized.
Embracing the open source philosophy, RISC-V promises increased innovation in hardware design, enhanced transparency (and hopefully, better security), and a break on the vendor lock traditionally enforced by proprietary architectures. If you do not like a particular vendor, say for performance or cost reasons, you can simply switch to a different one that implements the same RISC-V ISA with better performance or at a lower price point.
While we will not be targeting a particular vendor or implementation of RISC-V, we will use a set of tools that allow us to simulate such a processor, use a hardware emulator to boot our operating system, and then write our own! We will start by exploring the base 64-bit RISC-V ISA (called RV64I) that provides 32 base registers, each comprised of 32 bits. Memory addresses are 64-bit wide and can be used to address any available RAM space (we’ll revisit this later once virtual memory comes into play).
A Simple Example: Adding Two Integers
Before we set up our little RISC-V playground, let’s take a simple example assembly code that mimics our PowerCalc2024 calculator. We will not worry about input and output for now (that’s a story for a future article); we will restrict our focus to loading constant values into two registers and then adding them up.
Note: It might be worth it at this stage to peruse Chapters 2 and 4 of the RISC-V ISA specification here. You will notice that we will be mostly speaking of unprivileged instructions, though we will leave that discussion until a later stage.
First, we need to understand our registers. RV64I has 32 registers labeled x0 through x31. x0 is referred to as the zero register: it is a read-only register that always returns 0. You can think of it as being hardwired to ground. While x1 to x31 are all similar general-purpose registers from the hardware’s point of view, there is a convention on the software level that determines the use of each register. For example, x1 is used to store the return address of a function call and x2 stores a program’s stack pointer. The table below gives each register a name as well as its conventional description; you can refer to a particular register either by its name (t0) or its number (x5).
| Register | Name | Description |
| x0 | zero | Constant 0 |
| x1 | ra | Return address |
| x2 | sp | Stack pointer |
| x3 | gp | Global pointer |
| x4 | tp | Thread pointer |
| x5-x7 | t0-t2 | Temporary registers |
| x8 | s0 or fp | Saved register or frame pointer |
| x9 | s1 | Saved register |
| x10-x11 | a0-a1 | Return values or function arguments |
| x12-17 | a2-a7 | Function arguments |
| x18-x27 | s2-11 | Saved registers |
| x28-31 | t3-t6 | Temporary registers |
As we progress through this series, we will unravel the meaning of the use case of each of those registers when the need for it arises. For now, we will just use three temporary registers, t0, t1, and t2, corresponding to x5, x6, and x7, respectively.
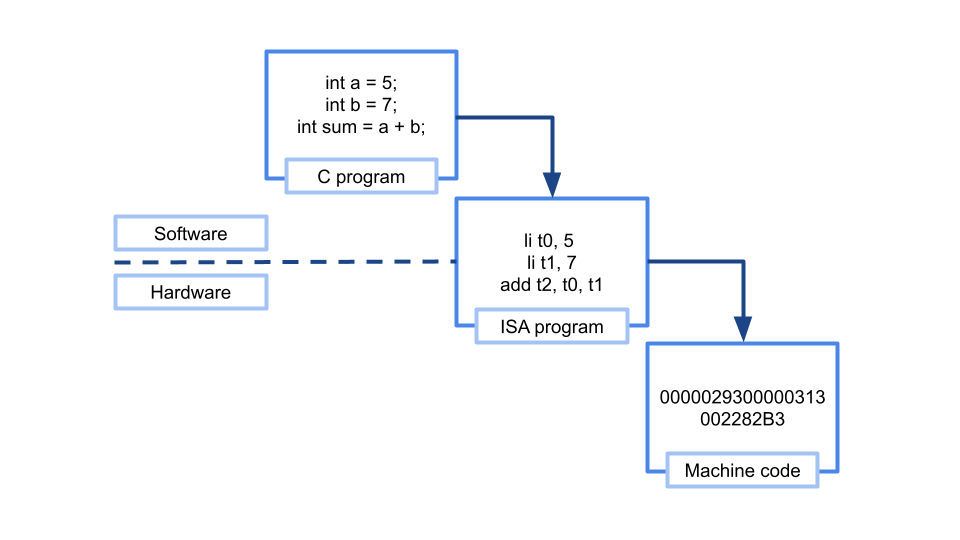
To get started, what we’d like to do is something akin to the following C snippet:
// assume t0, t1, and t2 are defined as integers
t0 = 3;
t1 = 5;

t2 = t0 + t1;
To do so in RISC-V assembly, we would write the following:
# add 0 to 3 and store the result in t0
addi t0, x0, 3
# add 0 to 5 and store the result in t1
addi t1, x0, 5

# add t0 to t1 and store the result in t2
add t2, t0, t1
You may notice that we have used two different addition instructions: addi and add. addi stands for add immediate, where the second parameter in that instruction is always a signed two’s complement integer. If you consult the RISC-V specifications, you can see that the immediate field in an addi instruction is limited to 12 bits, so we can only represent numbers from −211 to 210 − 1.
Conclusion and Next Steps
In this article, we introduced what an Instruction Set Architecture (ISA) is through a simple example. We then looked at an exciting open source RISC architecture, namely RISC-V, and discussed what it contributes to the world of computer architecture. We wrote a very simple assembly snippet that adds two integers using two variants of addition instructions: add and addi. Understanding the RISC-V ISA and how to program is the first leg on our journey to writing a simple operating system.
In the next article, we will walk through how to set up our toolchain and write a simple program that adds two integer registers and observe its behavior through the spike RISC-V simulator.
Source Code and Errors
The source code that I used in this article can be found in this repo. If you find any typos or errors in this article, or if you just have some suggestions or questions, the best thing you can do is to open an issue on the same repo and I will get to it as soon as possible.
About the Author
I am an assistant professor of Computer Science and Software Engineering at the Rose-Hulman Institute of Technology. I was born in Kherbet Selem, a small village in southern Lebanon, attended college in Beirut, and then moved to the US to complete my PhD at the University of Illinois at Urbana-Champaign. My enjoyment of operating systems started early in my childhood, when formatting my tiny hard drive and reinstalling Windows 95 (multiple times a day) was the only way to get any video game to run on my aging PC; I might have enjoyed typing the fdisk command more than I did the games themselves!